内核调试 环境
主机:Ubuntu 20.04.1 – 5.8.0-59-generic
内核源码:linux-5.4.120
GCC:9.3.0
Arch:x86_64
BusyBox
QEMU
在 Ubuntu 20.04 版本下不能直接通过sudo apt install qemu一次性全部安装。
因此需要分包安装,这里安装需要的sudo apt install qemu-system-x86_64。
配置过程 具体的可以参照相关资料 [1-3],这里简述一下他们的过程。
开启内核 Debug 功能
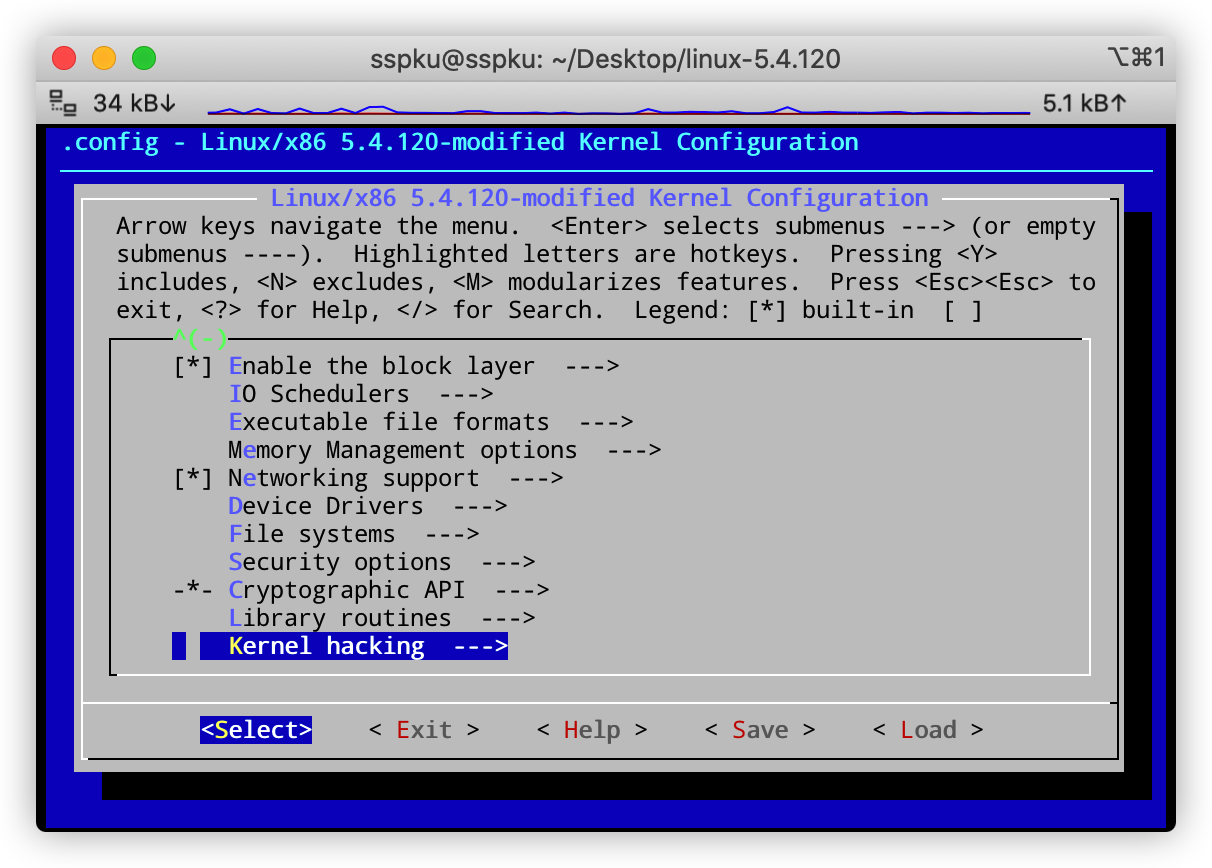
make menuconfig后选择Kernel hacking --->选项
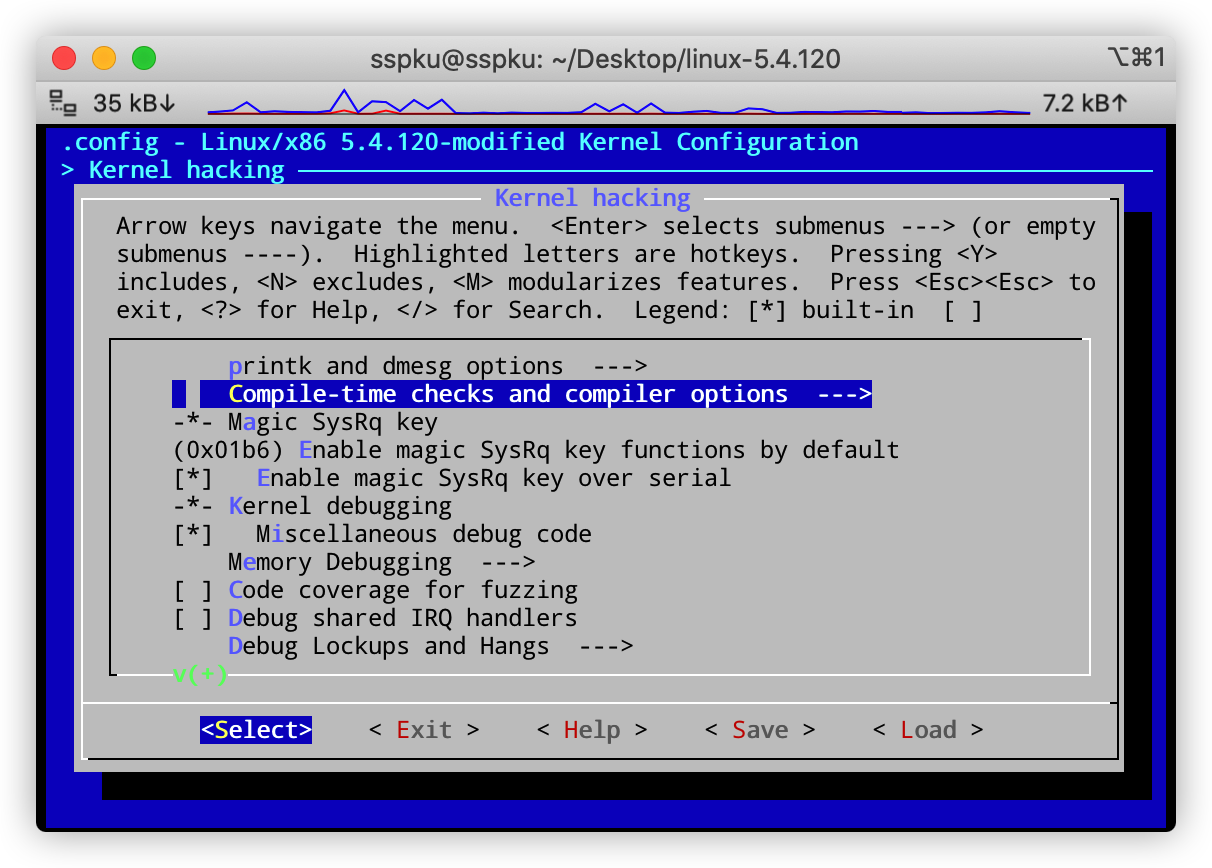
选择Compile-time checks and compiler options --->
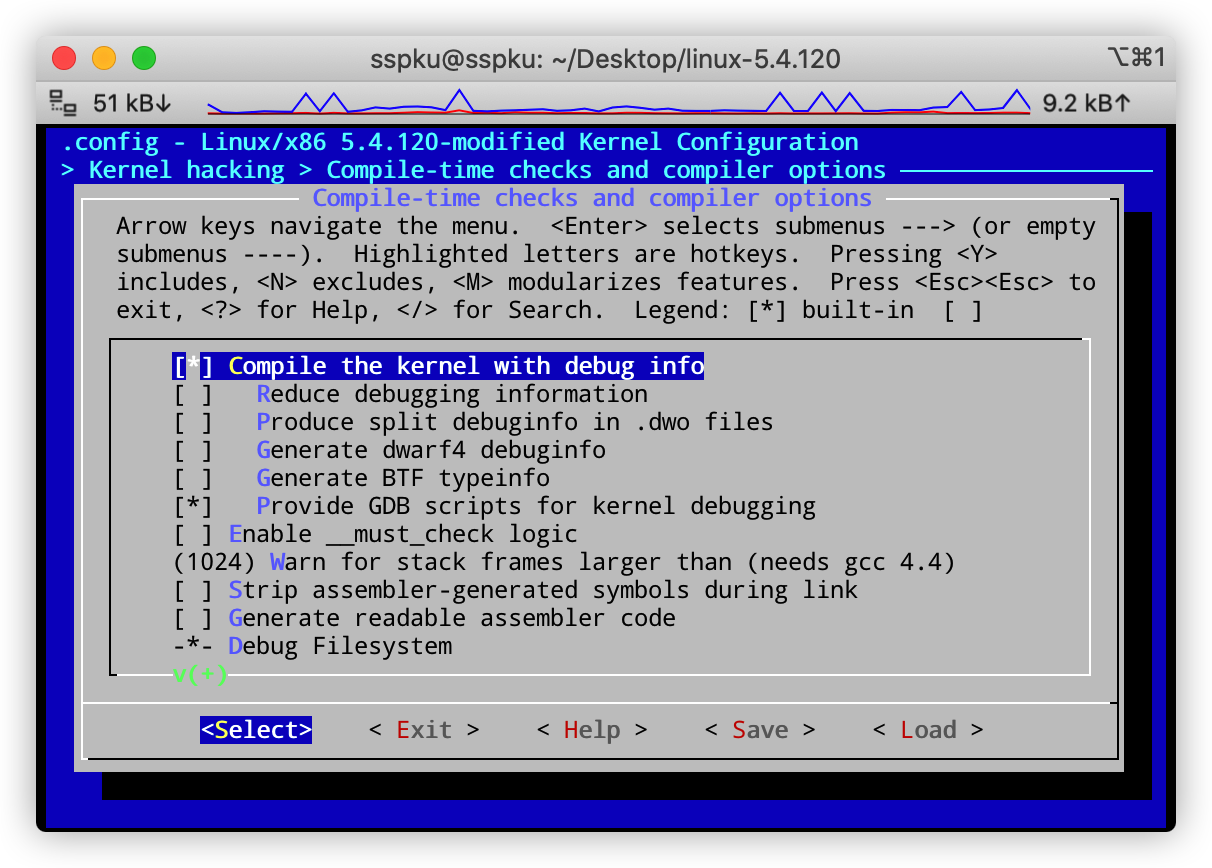
选中 Compile the kernel with debug info和Provide GDB scripts for kernel debugging两个选项
构建 initramfs 根文件系统 – Busybox 方式 这种方式的优点在于建构快速,而且十分轻量;但是最大的问题也在于太过简易,会存在一定的功能缺失,比如通过 QEMU 添加的设备无法识别。
initramfs 的唯一目的是挂载根文件系统。在引导时,引导加载程序将内核和 initramfs 映像加载到内存中并启动内核。内核检查是否存在 initramfs,如果找到,将其挂载为 / 并运行 /init。
这里借助Busybox构建简易的 initramfs 根文件系统。编译Busybox的步骤:
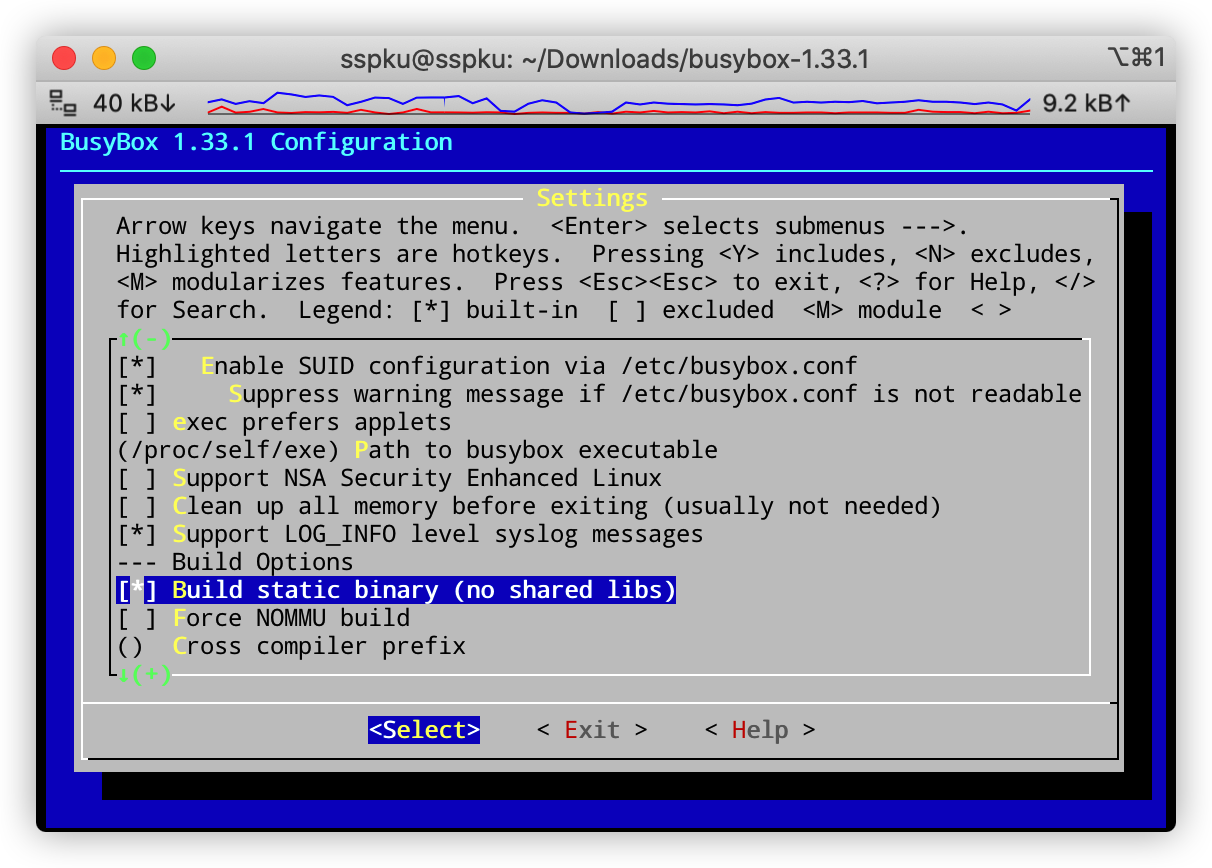
编译选项:make menuconfig —> Settings —> Build static binary (no shared libs)
make -j$(nproc)make install
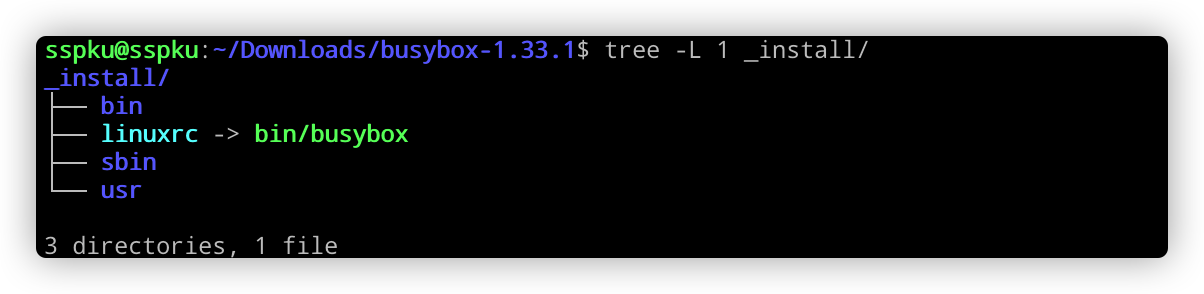
安装完成以后目录下会有一个_install文件夹
根据_install文件夹创建一个initramfs。initramfs文件夹可以在任意目录。
1
2
3
4
5
6
7
cp -r _install initramfscd initramfsln -s bin/busybox initmkdir -pv {bin,sbin,etc,proc,sys,usr/{bin,sbin},dev,lib,lib64}rm linuxrc
链接的 init 程序首先会访问 etc/inittab 文件
1
2
3
4
5
6
7
8
9
10
cd etcecho "::sysinit:/etc/init.d/rcS" > inittabecho "::askfirst:-/bin/sh" >> inittabecho "::restart:/sbin/init" >> inittabecho "::ctrlaltdel:/sbin/reboot" >> inittabecho "::shutdown:/bin/umount -a -r" >> inittabecho "::shutdown:/sbin/swapoff -a" >> inittabchmod +x inittab
然后紧接着编写 inittab 所需的 rcS 文件
1
2
3
4
5
mkdir init.dcd init.dvim rcS chmod +x rcS
rcS 内容如下:
1
2
3
4
5
6
7
#!/bin/sh mount proc mount -o remount,rw / mount -a clear echo "My Tiny Linux Start :D ......"
由于mount -a命令会自动挂载*/etc/fstab* 文件内的文件系统。因此需要编写 fstab 文件,这里分别挂载常用的四个文件系统。fstab 内容如下:
1 2 3 4 5 6 7 8 proc /proc proc defaults 0 0 sysfs /sys sysfs defaults 0 0 devtmpfs /dev devtmpfs defaults 0 0 securityfs /sys/kernel/security securityfs rw,relatime 0 0
打包initramfs文件夹
1 2 find . -print0 | cpio --null -ov --format=newc | gzip -9 > ../initramfs.cpio.gz
构建 initramfs 根文件系统 – rootfs 方式 这种方式的优点在于系统结构完整,拥有完整操作系统的使用体验;但是缺点在于修改构建较为复杂。另外,这种方式下,可以检测到 QEMU 挂载的设备。
具体的可以参照相关资料 [12],这里简述一下其过程。
首先在http://cdimage.ubuntu.com/cdimage/ubuntu-base/releases/20.04/release/ ,下载一个 ubuntu 文件系统的 base 包,这里面包含一些基础的目录结构以及文件。
然后创建一个磁盘镜像来装载 base 包中的文件。
1 2 3 4 dd if =/dev/zero of=rootfs.img bs=10240 count=1Mmkfs.ext4 -F -L linuxroot rootfs.img
为了把 base 包放入镜像中,需要将其挂。然后将下载好的 base 包解压到磁盘中。
1 2 3 4 sudo mkdir /mnt/tmpdir sudo mount -o loop rootfs.img /mnt/tmpdir/ tar -zxvf ubuntu-base-20.04.1-base-amd64.tar.gz -C /mnt/tmpdir/
然后为了在其上安装必要的基础程序,先配置好 DNS,以及挂载必要的文件系统。
1
2
3
4
5
sudo cp /etc/resolv.conf /mnt/tmpdir/etc/ sudo mount -t proc /proc /mnt/tmpdir/proc sudo mount -t sysfs /sys /mnt/tmpdir/sys sudo mount -o bind /dev /mnt/tmpdir/dev sudo mount -o bind /dev/pts /mnt/tmpdir/dev/pts
挂在好之后,修改根目录。
然后安装必要的软件。以下的软件如果不全部安装,则在启动虚拟机时,会启动失败。以下软件全部安装大概需要 800MB+的空间,因此最初的磁盘不能创建过小。
1
2
3
4
5
6
apt-get update apt-get install language-pack-en-base sudo \ ssh net-tools ethtool wireless-tools \ ifupdown network-manager iputils-ping \ rsyslog htop vim xinit xorg alsa-utils \ --no-install-recommends
然后给 root 设置一个密码,不然启动虚拟机之后会出现无法登录的尴尬问题。
1 2 3 4 5 passwd root passwd <user>
最后配置下必要的路由信息和主机名。
1
2
echo "host" > /etc/hostnameecho "127.0.0.1 localhost" >> /etc/hosts
至此基本的配置已经结束。如果有需要可以自行通过apt-get工具下载所需的软件,或是修改本地的配置文件。按下Ctrl D即可退出 chroot 的根目录,回到之前的根目录。
1
2
3
4
5
sudo umount /mnt/tmpdir/proc/ sudo umount /mnt/tmpdir/sys/ sudo umount /mnt/tmpdir/dev/pts/ sudo umount /mnt/tmpdir/dev/ sudo umount /mnt/tmpdir/
调试 通过 QEMU 启动内核
1 2 3 4 5 qemu-system-x86_64 -s -kernel /path/to/vmlinux -initrd /path/to/initramfs.cpio.gz -nographic -append "console=ttyS0" qemu-system-x86_64 -s -kernel /path/to/vmlinux -hda /path/to/rootfs.img -nographic -append "root=/dev/sda console=ttyS0"
-s:代表-gdb tcp::1234表明启动一个 gdbserver 并监听端口 1234-kernel:执行内核程序vmlinux-initrd:指定 initramfs 根文件系统-hda:指定一个文件作为硬盘 0。-nographic:取消 QEMU 的图形输出-append:设置内核启动的 CMDLINE。这里将输出重定向到 console,将会显示在标准输出 stdio。
执行后的根目录,与 initramfs 文件夹一致
一些发行版可能会限制 gdb 脚本的自动加载到已知的安全目录。如果 gdb 报告拒绝加载 vmlinux-gdb.py,执行下列命令。
1 echo "add-auto-load-safe-path /path/to/linux-build" >> ~/.gdbinit
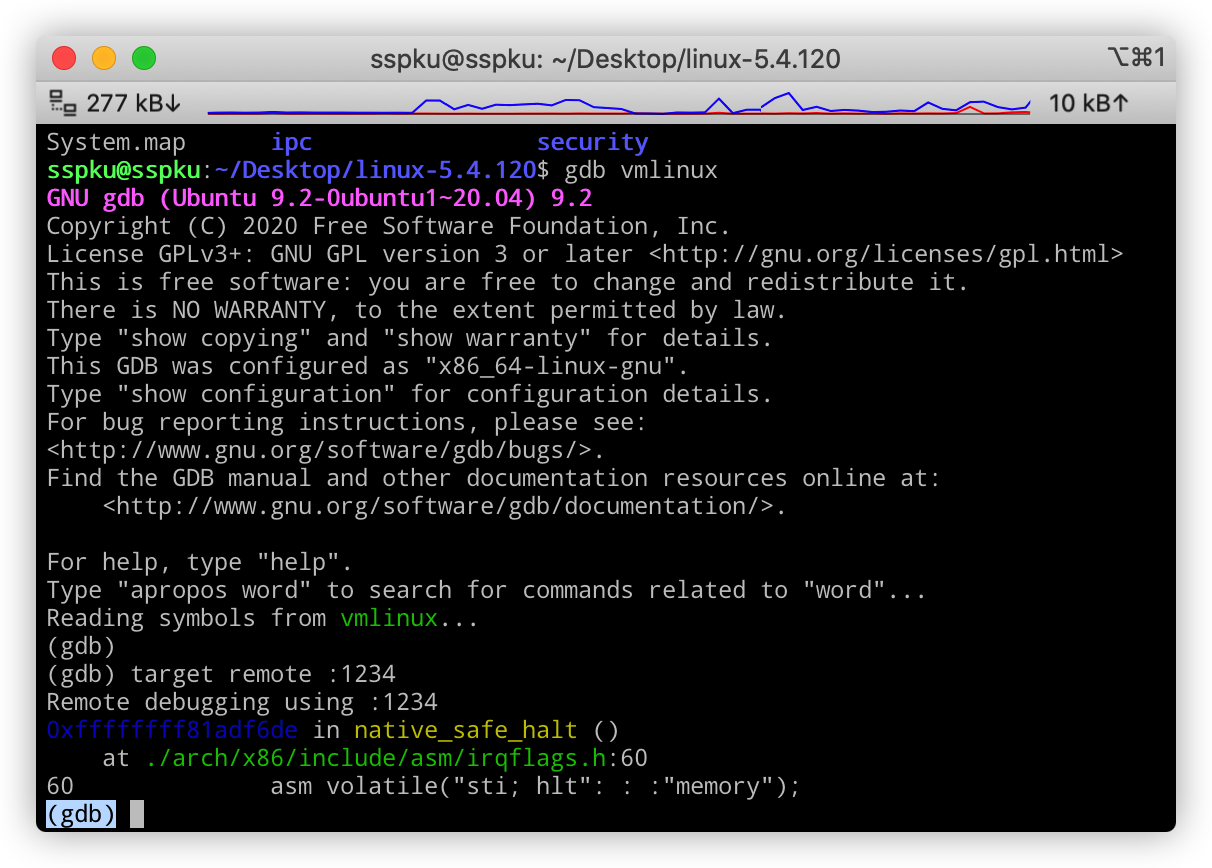
然后启动 GDB
1
2
gdb /path/to/vmlinux (gdb) target remote :1234
查看内核提供的 GDB 辅助调试功能
获取当前进程的 pid
1 (gdb) p $lx_current ().pid
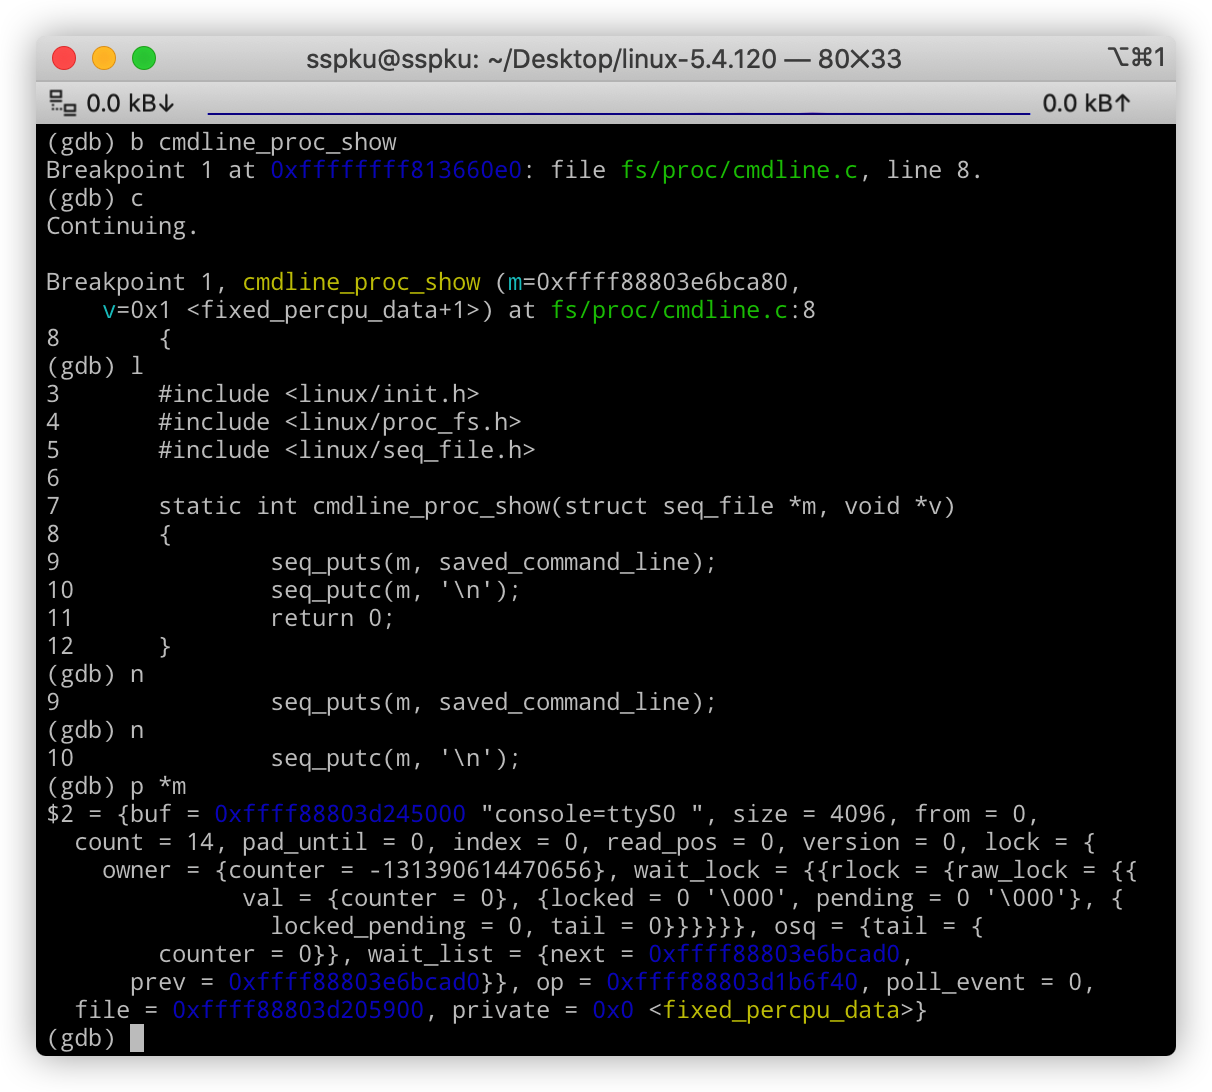
在函数cmdline_proc_show设置断点,然后在 QEMU 虚拟机内执行cat /proc/cmdline触发断点。触发了之后就可以像普通程序的调试那样调试内核。
1
2
3
4
(gdb) b cmdline_proc_show Breakpoint 1 at 0xffffffff813660e0: file fs/proc/cmdline.c, line 8. (gdb) c Continuing.
最后,如果需要关闭 QEMU 虚拟机,可以在虚拟机使用poweroff命令关机。
内核模块编写 添加自定义模块 这里添加的内核模块,并不是指在用户态编写并编译完成之后通过 insmod 安装的模块,而是指直接在内核源码中编写的模块,并通过 make 命令一同编译。
以自定义的 hello 模块为例。 该模块位于security/integrity/hello 。
1
2
3
4
5
6
7
8
mkdir security/integrity/hellocd security/integrity/hellotouch Makefiletouch Kconfigtouch hello_main.c
Kconfig 首先打开security/integrity/Kconfig ,在其末尾添加上 hello 的 Kconfig 路径。
1
2
3
source "security/integrity/ima/Kconfig" source "security/integrity/evm/Kconfig" source "security/integrity/hello/Kconfig"
然后仿照格式编写一个简单的 Kconfig 在security/integrity/hello/Kconfig 目录下。
这里只是一个极简的写法,表明仅有一个 bool 参数,默认值为 n。
1
2
3
4
5
config HELLO bool "hello world module" default n help Enable hello world module
Makefile 同样先处理父级目录security/integrity/Makefile ,添加 hello。
1 2 3 obj-$(CONFIG_IMA) += ima/ obj-$(CONFIG_EVM) += evm/ obj-$(CONFIG_HELLO) += hello/
然后仿照 ima 的 makefile 编写security/integrity/hello/Makefile 。
1 2 3 obj-$(CONFIG_HELLO) += hello.o hello-y := hello_main.o
这种 Makefile 写法的解释可以参照相关资料 [6-8]。简单来说就是,当变量的值为y或m时,表示编译这个对象。也即根据hello-y编译hello.o,然后如果$(CONFIG_HELLO)为y则会将hello.o编译进内核。
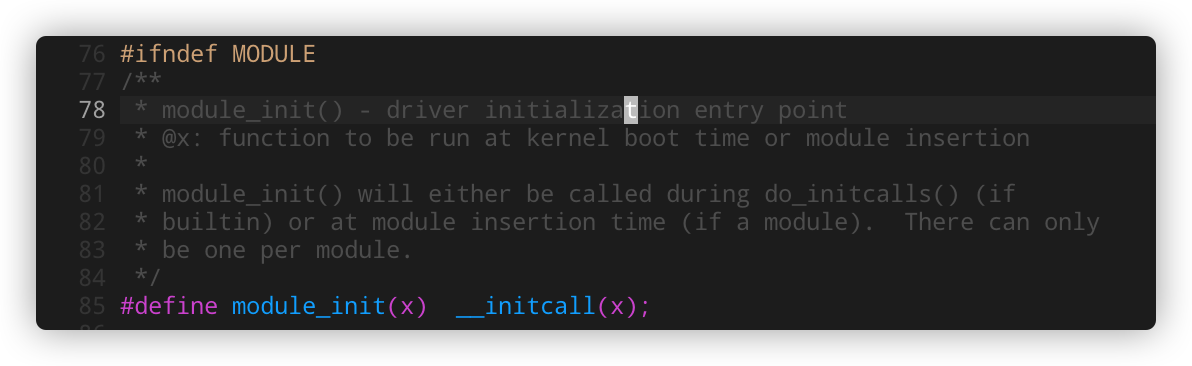
hello_main.c 1 2 3 4 5 6 7 8 9 #include <linux/module.h> static int __init init_hello (void ) { printk(KERN_ALERT "hello world test!" ); return 0 ; } late_initcall(init_hello);
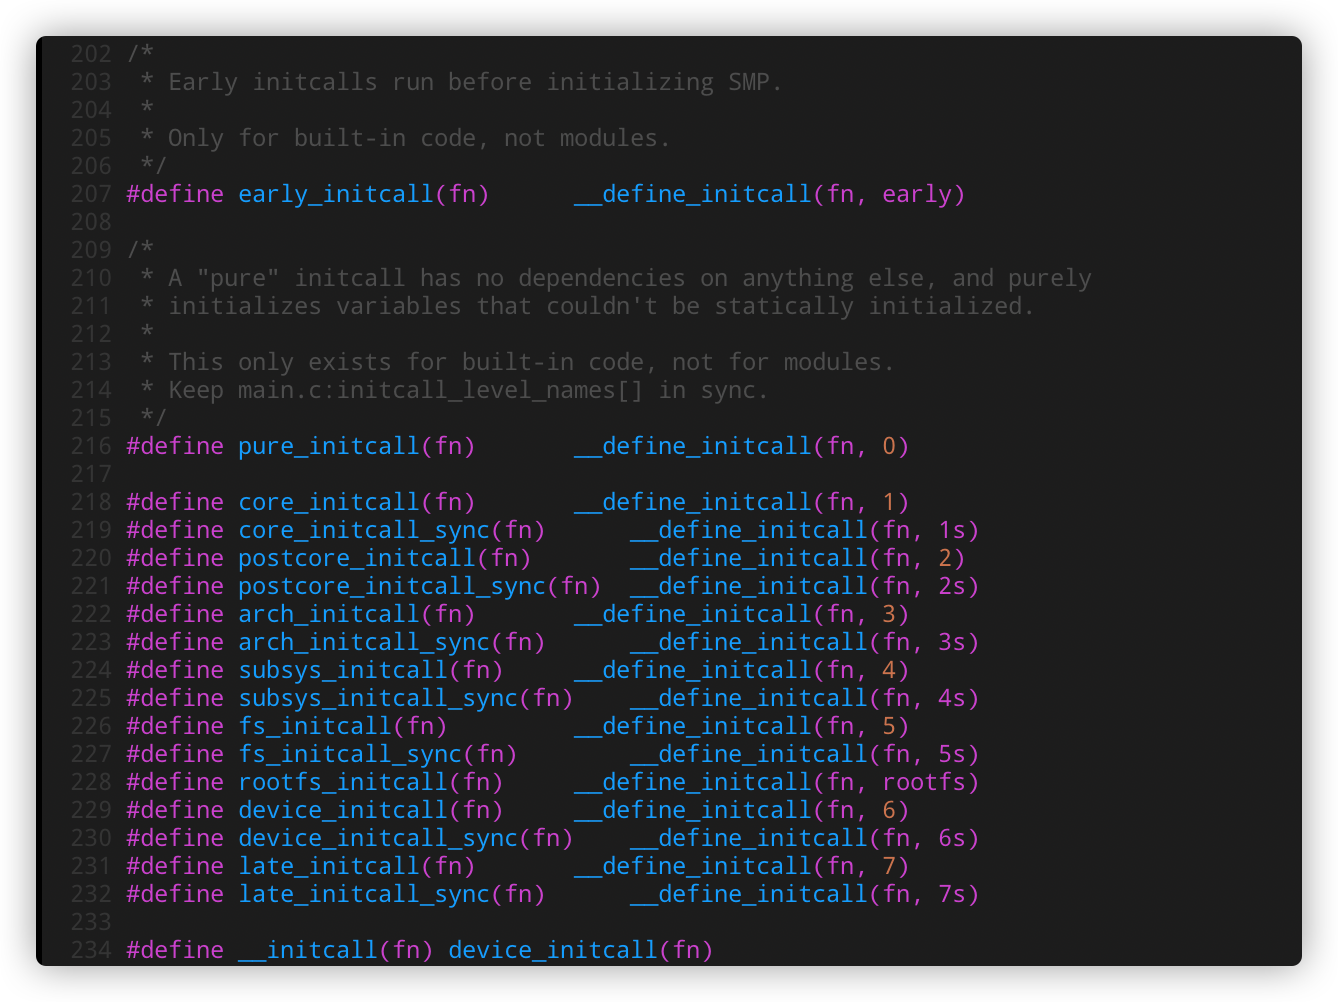
这里的late_initcall涉及到一个内核初始化顺序的问题。
这个初始化的优先级由include/linux/init.h 文件定义,数字越小优先级越高。
这里还存在一个常见的内核模块初始化级别module_init(位于include/linux/module.h )。
结合上面的截图,不难看出module_init的初始化级别等同于device_initcall。
按初始化顺序排序:
early_initcall
pure_initcall
core_initcall
postcore_initcall
arch_initcall
subsys_initcall
fs_initcall
rootfs_initcall
device_initcall、module_init
late_initcall
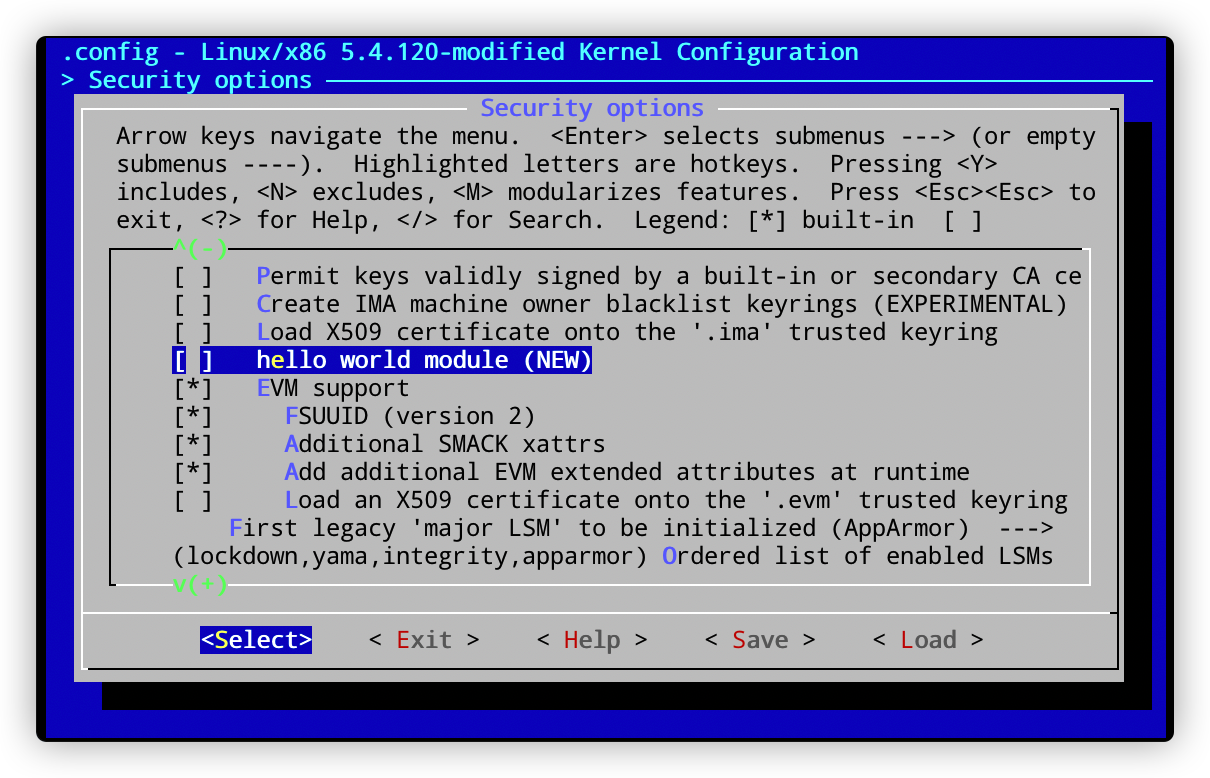
效果 “hello world module”选项即为配置的 hello 模块的 CONFIG_HELLO 参数。
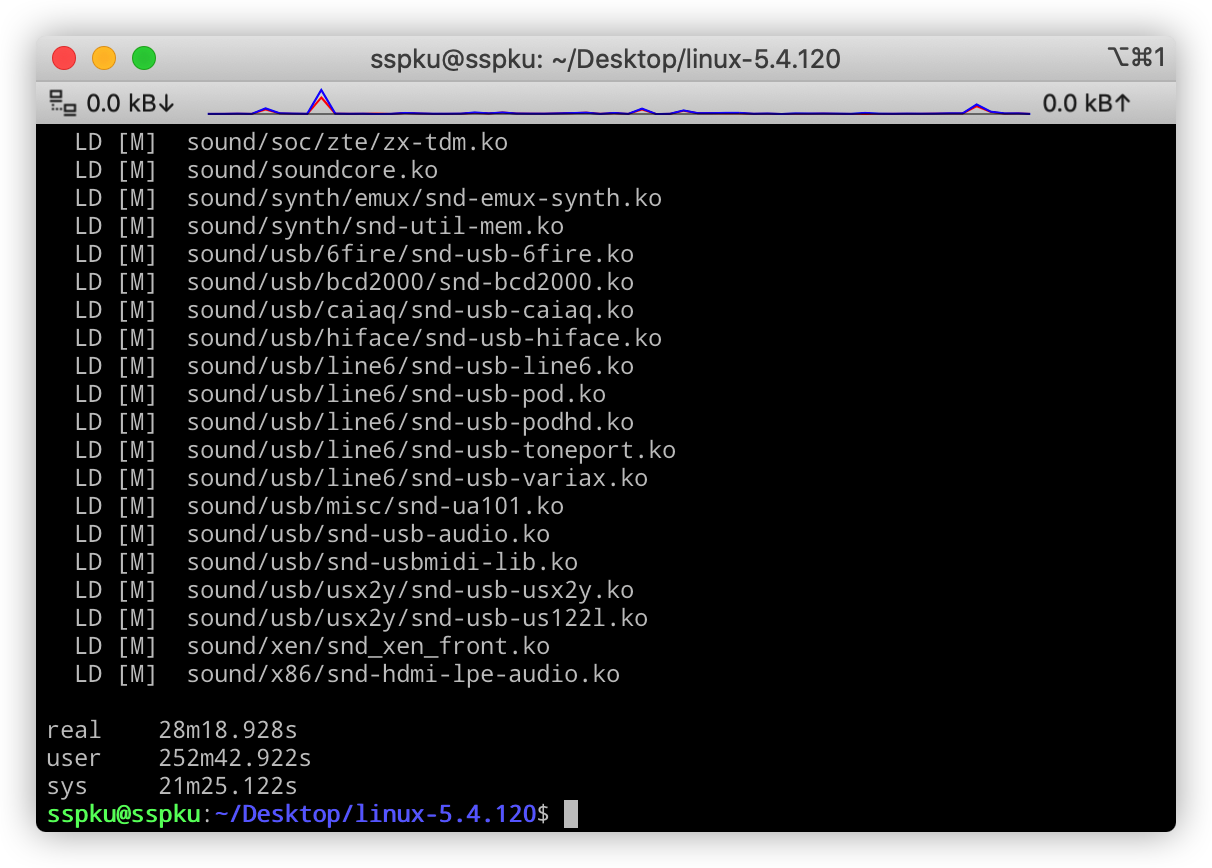
编译并启动内核,可以在dmesg中看到 hello 模块输出的信息
在调试环境下执行程序 由于之前通过 busybox 创建的简易的文件系统initramfs包含的内容太少,无法直接在里面运行的第三方程序或者是编译 C 程序。
比如实现了一个函数叫clone_hook。
1 2 3 4 int clone_hook (void ) { printk("[clone hook] called by clone!" ); return 0 ; }
然后在kernel/nsproxy.c文件中被调用,即在 clone 调用的相关函数copy_namespaces中添加clone_hook函数的调用。
如果想要测试clone_hook的执行,就需要去执行clone系统调用。这个在正常的操作系统下是没有问题的,但如果使用的是内核调试 部分创建的简易文件系统的话,则会执行失败。
如上图所示,如果执行成功则会出现*[clone hook] called by clone!*的信息。然而并没有。(clone_test程序的作用是:执行clone系统调用)
这个问题出现的主要因素在于:clone_test.c 是使用了 C 标准库编写的,自制的 initramfs 文件系统里缺少相关的动态链接库,从而导致了执行的失败。
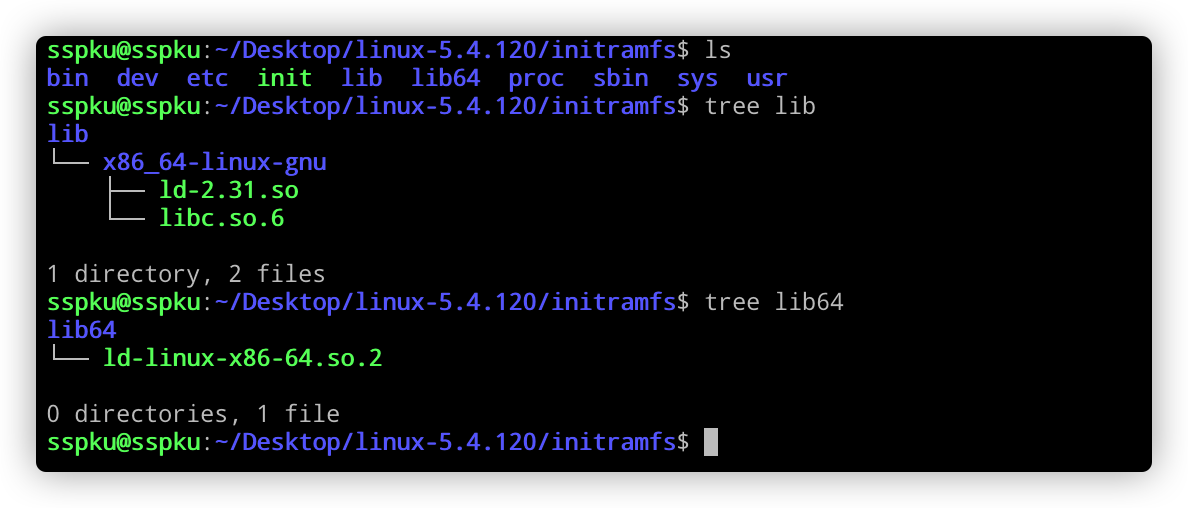
通过ldd命令查询clone_test程序所需的动态链接库
然后在自制的initramfs目录下,创建同名的lib以及lib64目录。并将所需的动态链接库拷贝到相同的位置。
最后重新打包initramfs.cpio.gz文件,并执行clone_test。这次就可以看到clone_hook成功执行,以及clone_test程序也成功打印出了子进程的pid。
clone_test.c :
1 2 3 4 5 6 7 8 9 10 11 12 13 14 15 16 17 18 19 20 21 22 23 24 25 26 27 28 29 30 31 32 33 34 35 36 37 38 39 40 41 42 43 #define _GNU_SOURCE #include <sched.h> #include <stdio.h> #include <stdlib.h> #include <sys/wait.h> #include <unistd.h> #include <sys/types.h> #include <signal.h> static char child_stack[5000 ];void grchild (int num) { printf ("child(%d) in ns my PID: %d Parent ID=%d\n" , num, getpid(),getppid()); sleep(5 ); puts ("end child" ); } int child_fn (int ppid) { int i; printf ("PID: %ld Parent:%ld\n" , (long )getpid(), getppid()); for (i=0 ;i<3 ;i++) { if (fork() == 0 ) { grchild(i+1 ); exit (0 ); } kill(ppid,SIGKILL); } sleep(2 ); kill(2 ,SIGKILL); sleep(10 ); return 0 ; } int main () { pid_t pid = clone(child_fn, child_stack+5000 , CLONE_NEWPID , getpid()); printf ("clone() = %d\n" , pid); waitpid(pid, NULL , 0 ); return 0 ; }
加快内核编译速度
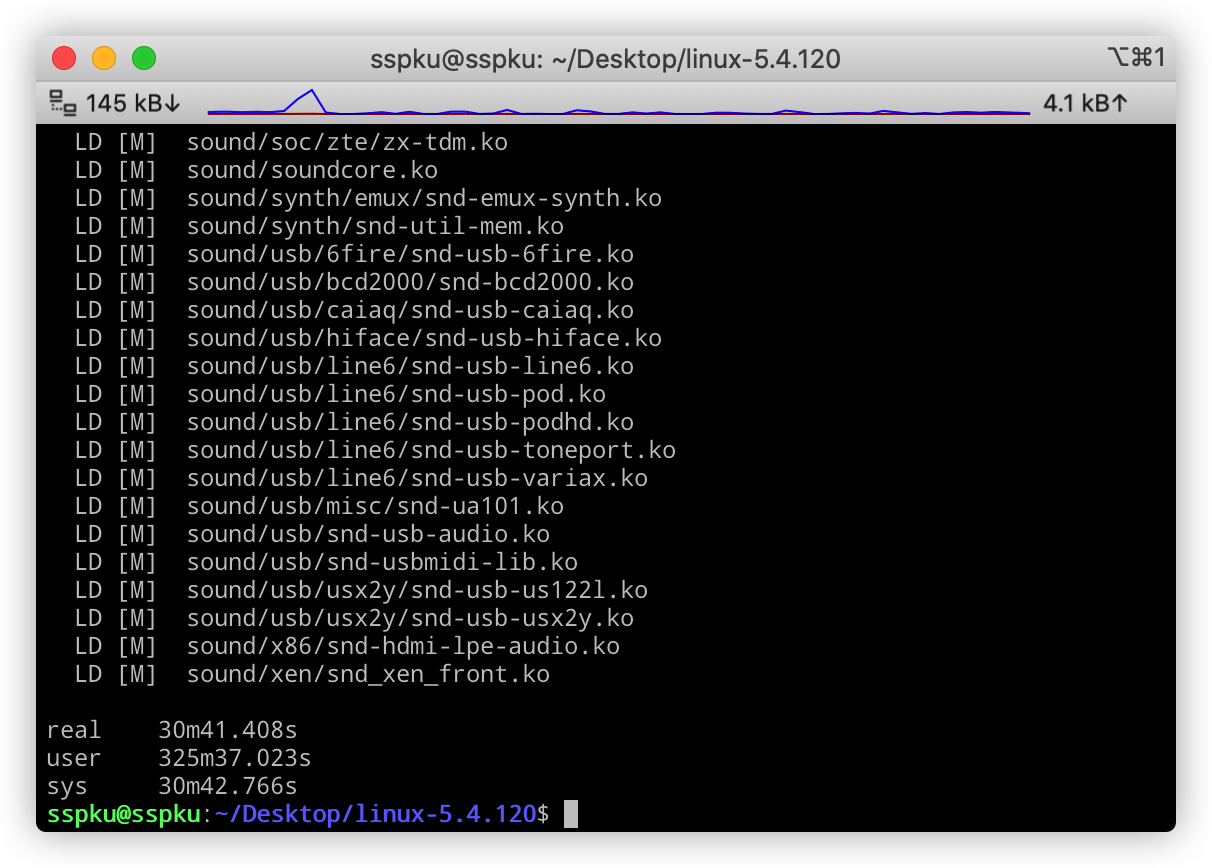
无任何配置
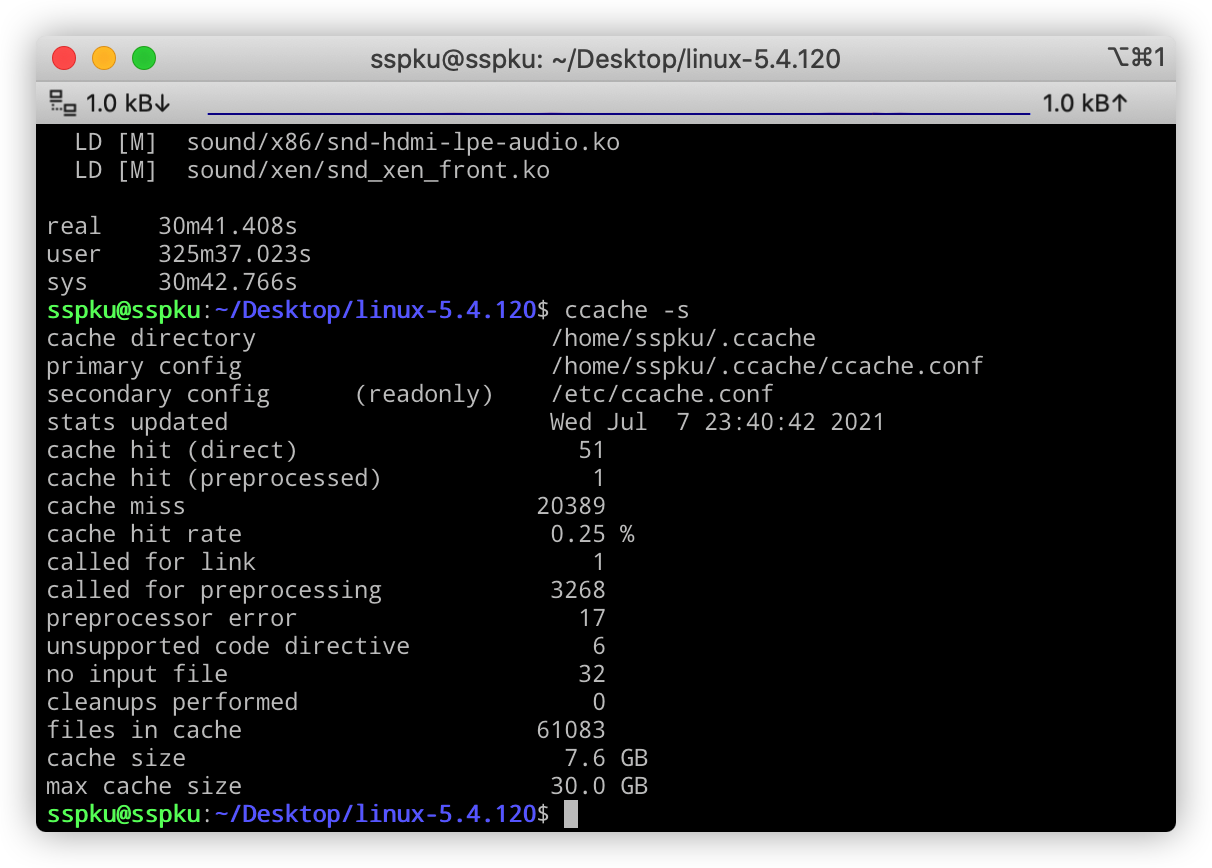
ccache
1 2 3 4 5 6 7 8 9 10 11 12 13 14 15 sudo apt install ccache cd $HOME vim .bashrc source .bashrcccache -M 30G ccache gcc xxx make CC='ccache gcc' -j$(nproc )
配置了之后,时间更长了。
缓存的命中率较低,可能这就是导致时间开销更多的原因。
initramfs.conf
修改/etc/initramfs-tools/initramfs.conf 配置,MODULES=dep,COMPRESS=lzop
附录 附上一个构建脚本
1 2 3 4 5 6 7 8 9 10 11 12 13 14 15 16 17 18 19 20 21 22 23 24 25 26 27 28 29 30 31 32 33 34 35 36 37 38 39 40 41 42 43 44 45 46 47 48 49 50 51 52 53 54 55 56 57 58 59 60 61 62 63 64 65 66 67 68 69 70 71 72 73 74 75 76 77 78 79 80 81 82 83 84 85 86 87 88 89 90 91 92 93 94 95 96 97 98 99 100 101 102 103 104 105 106 107 108 109 110 111 112 113 114 115 116 117 118 119 120 121 122 123 124 125 126 127 128 129 130 131 132 133 134 135 136 137 138 139 140 141 142 143 144 145 146 #!/bin/bash print_help echo "Usage: run_kernel.sh [-a <append>] (-m/t) <method>" echo " -h: Show this message." echo " -a: append cmdline argument to the kernel running in the qemu. This argument should set before -m or -t." echo " -m: Choose method." echo " 'debug': Start a qemu virtual machine. Initrd is created by busybox." echo " 'init': Package the initramfs directory to the initramfs.cpio.gz. It used in qemu." echo " 'build': Build the linux kernel just with stderr. Additionally, it will run make clean before." echo " -t: rootfs method" echo " 'debug': Start a qemu virtual machine with a vtpm device. Initrd is a rootfs." echo " 'rfs': Create the disk." echo " 'init': mount the rootfs to set up." echo " 'uinit': after init, umount the rootfs." } if [ $# -eq 0 ]; then print_help fi while getopts "hm:a:t:" optname; do case "$optname " in "h" ) print_help ;; "a" ) CMDLINE="$OPTARG " ;; "m" ) if [ "$OPTARG " x = "debug" x ]; then pid=$(ps -ef | grep 'qemu-system-x86_64' | grep -v 'grep' | awk '{print $2}' ) if [ ! $pid ]; then echo "the process 'qemu-system-x86_64' is not run!!!" else echo "the process 'qemu-system-x86_64' is running!!!" kill -9 $pid echo "the process 'qemu-system-x86_64' has been killed!!" fi echo run kernel in qemu for debug qemu-system-x86_64 -m 1024 -enable-kvm -s -kernel ./vmlinux -initrd ./initramfs.cpio.gz -nographic -append "console=ttyS0 $CMDLINE " elif [ "$OPTARG " x = "init" x ]; then echo package the initramfs echo "Copy Device file, permission needed!" cd initramfs find . -print0 | cpio --null -ov --format=newc | gzip -9 >../initramfs.cpio.gz cd - elif [ "$OPTARG " x = 'build' x ]; then echo start build linux kernel time make -j$(nproc ) >/dev/null elif [ "$OPTARG " x = 'disk' x ]; then dd if =/dev/zero of=test.disk bs=512 count=$((32 * 1024 * 1024 / 512 )) mkfs.ext4 -q test.disk else print_help fi ;; "t" ) if [ "$OPTARG " x = "debug" x ]; then qemu-system-x86_64 -m 1024 -enable-kvm -s \ -boot d -bios $SEABIOS_PATH /bios.bin \ -kernel ./vmlinux -hda ./rootfs.img \ -nographic -append "root=/dev/sda console=ttyS0 $CMDLINE " elif [ "$OPTARG " x = "rfs" x ]; then dd if =/dev/zero of=rootfs.img bs=10240 count=1M sudo mkfs.ext4 -F -L linuxroot rootfs.img wget http://cdimage.ubuntu.com/cdimage/ubuntu-base/releases/20.04/release/ubuntu-base-20.04.1-base-amd64.tar.gz -O ubuntu-base-amd64.tar.gz sudo rmdir /mnt/tmpdir sudo mkdir /mnt/tmpdir sudo mount -o loop rootfs.img /mnt/tmpdir/ sudo tar -zxvf ubuntu-base-amd64.tar.gz -C /mnt/tmpdir/ sudo cp /etc/resolv.conf /mnt/tmpdir/etc/ sudo mount -t proc /proc /mnt/tmpdir/proc sudo mount -t sysfs /sys /mnt/tmpdir/sys sudo mount -o bind /dev /mnt/tmpdir/dev sudo mount -o bind /dev/pts /mnt/tmpdir/dev/pts sudo chroot /mnt/tmpdir apt-get update && \ apt-get install -y \ language-pack-en-base \ sudo \ ssh \ net-tools \ ethtool \ wireless-tools \ ifupdown \ network-manager \ iputils-ping \ rsyslog \ htop \ vim \ xinit xorg \ alsa-utils \ attr \ --no-install-recommends && \ passwd elif [ "$OPTARG " x = "init" x ]; then sudo rmdir /mnt/tmpdir sudo mkdir /mnt/tmpdir sudo mount -o loop ./rootfs.img /mnt/tmpdir/ sudo mount -t proc /proc /mnt/tmpdir/proc sudo mount -t sysfs /sys /mnt/tmpdir/sys sudo mount -o bind /dev /mnt/tmpdir/dev sudo mount -o bind /dev/pts /mnt/tmpdir/dev/pts sudo chroot /mnt/tmpdir elif [ "$OPTARG " x = "uinit" x ]; then sudo umount /mnt/tmpdir/proc/ sudo umount /mnt/tmpdir/sys/ sudo umount /mnt/tmpdir/dev/pts/ sudo umount /mnt/tmpdir/dev/ sudo umount /mnt/tmpdir/ else print_help fi ;; "?" ) print_help ;; esac done
相关资料
使用 QEMU 和 GDB 调试 Linux 内核 About initramfs Linux 内核 0-使用 QEMU 和 GDB 调试 Linux 内核 Debugging kernel and modules via gdb Linux 内核配置以及 Make menuconfig 过程分析 KConfig 使用介绍 Whats meaning of obj-y += something/ in linux kernel Makefile? linux 内核可加载模块的 makefile Linux 内核的 Makefile 内核初始化的模块顺序 Documentation/kbuild/modules.txt QEMU+gdb 调试 Linux 内核全过程 Qemu 调试内核环境搭建